Sunday, October 27, 2013

Halloween


Growing up as a child I never went trick or treating, in Australia Halloween isn't a very big tradition for us so I never got to participate. Its one of those activities I thought I would enjoy more when I was a child, but playing and experimenting with makeup and making up scary looks has been extremely entertaining for me. I was obsessed every since I saw Stephanie(SMLxo) do tutorial and I knew that I couldn't wait to try out different, fun and exciting ways to play with makeup and new products I wouldn't have used before. 
My friend Lisa had been invited to a Halloween party and we were brain storming on ideas of what she could go as. It was between school girl and cheerleader. She decided on half dead cheerleader. One side normal the other dead looking.
We were extremely happy with the way it came out! It becomes so addictive because we started with the face then moved to neck than moved onto arms to finish of the look with bruises and cuts.

 
We started with a bare face we did apply primer to the face as we need the makeup to be long wearing. To stick down the eyebrow and to make it a lighter colour we used white soap.

 
Moving forward a few steps. We added a light/white foundation to half of the face. We also went over it with white eye shadow and translucent powder to set the foundation but also to keep it matte. We than coloured it the hallow points in the face so the eye socket, jaw, temple and teeth. I used the NYX jumbo pencil in black which was perfect but again used a black eye shadow to set it.   


In this photo you can see I added some grey eye shadow to contour and blend, this adds an extra dimension. I also used the white NYX jumbo pencil to make the teeth whiter.


We than applied the glamorous side of the cheerleader, making sure we used lots of bronzer to contour and highlight.


Than the fun begins making bruises and cuts. We added fake blood for more of an effect but to also give it extra texture to make it appear even more real.


The final look! Of course it wouldn't be a cheerleader without pigtails so we did one normal cute and curly the next teased and messy.


I hope you enjoyed this half dead cheerleader look. I would love to see any other Halloween Tutorials or Pictorials please leave a comment below and I'll check it out.

Thank you to beautiful Lisa for being so patient.

Until next time

Suzie

xoxox

Sunday, October 20, 2013

Lunch Date OOTD

Today's outfit of the day was a casual, comfy and stylish look. I am not normally a girl that wears jeans but for today as I wanted to dress down this shirt it was a perfect match. I teamed it with a brown smokey eye, gold accessories and brown clutch which I thought mixed well with bright shirt without being to over powering.
 
Shirt: Portmans
Jeans: Jeans West
Cuff: Colette Hayman
Clutch: Michael Kors  
Ring: Lovisa


Thank you for viewing my blog
 
Please subscribe
 
Suzie
 
xoxox

Wednesday, October 16, 2013

Electric Blue!!

Electric Blue, not an eye Shadow colour I normally lean towards but for my outfit on Saturday night I thought it was the perfect way to spice up my Little Black Dress (LBD). As you know I would normally team this with a smokey eye or my signature Emerald green look, but for this occasion I thought I would try something different. My outfit for Saturday night was a very simple black dress, this is why I wanted to go dramatic with my hair and makeup.


The following products were used to create this look
Bh Cosmetics 88 Shadow palette
Maybelline Colour Tattoo- in Electric blue
Napoleon Perdis loose dust in - Blue number 29
NYX- Frosted Ocean
Wet n Wild Coloricon in - Blue
Mac paint pot- Black
MUA- Lashes
 
And these products where just for the eyes. This look took me around 45 minutes but was well worth the effort. One tip I would suggest when doing a dramatic eye like this is to start with the eyes first, just in case there is any fallout. I also tapped sticky tape under my eye, to help remove the glitter and eyeshadow fallout. This also helps make a perfect line from the end of my lashes to the end of my brow.
For my hair I used good old fashion Hot Rollers. For me this is the best way to get big, bouncy, Victoria Secret Curls. To create the extra volume I teased my hair before putting in the rollers. I have found by completing this step first it doesn't wreck the curls afterwards.
 
I hope you have enjoyed this post
Please subscribe through Bloglovin
 
Suzie
 
xoxo  

Wednesday, October 9, 2013

New Hair

Let me just start by saying WOW! I couldn't believe how long I had left my hair for!
I am very lucky when it comes to my hair. I don't have to style it to much and when it comes to dying it the colour seems to stay in longer than others. This time though I had hit a new extreme, I am embarrassed to say this, but it was literally 4 months since I had dyed my hair last. Yes 4 months not a typo. Anyways I didn't really notice that it had changed so much but when I did dye it I was amazed. I am loving my new colour and I promise I will NEVER let it get that bad again!
So I thought I would show you some of the steps and products I use to dye my hair. Because I do a all over colour and do not do highlights ect I have started doing it myself. The reason for this is that in Australia a quality cut and colour can cost anywhere from $150.00 to $350.00. This way I go to my local hair store "Price Attack"(like a Sally's for the USA girls) and get the products I need to do it myself. The funny thing is that it only costs me $30.00 using the same products that my hairdresser uses! I know why wouldn't I right. From my experience and talking to friends this is a much better way than buying the DIY boxes that you can purchase at supermarkets. I have heard that the box sets don't last long in your hair maybe 3 to 5 weeks tops, and can damage your hair more than at the salon.
So far so good, I am really happy with the results.


BEFORE


AFTER


Such a Difference! I am loving my new hair colour.
 
Let me know any of your DIY hair colouring tips.
 
Please subscribe via Bloglovin
 
Thank you
 
Suzie
 
xoxoxo
 

Sunday, October 6, 2013

OOTD


Ok so I thought I would do a quick outfit of the day today! This is just a semi, casual outfit for a busy day of running around and seeing friends. The thing I love about this outfit is that it looks well put together and is a versatile outfit. It’s perfect to go to the shops in or I love that you can throw on a pair of heels and some more accessories and you immediately have a dressy night look. In spring and summer I love to wear bright pops of colour and beautiful bold prints. This colour is gorgeous I love the pink shade and the gold details of the buttons; it’s such a signature piece of my wardrobe.  


Ring: Lovisa
Shirt: Forever New
Skirt: Kmart
 
 
I hope you enjoyed this OOTD! Please subscribe via Bloglovin
 
Thanks for viewing
 
Suzie
 
xoxo


Wednesday, October 2, 2013

OOTD Style Look Book

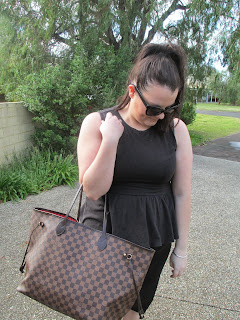
Hi Everyone! So I must start by apologising for my lack of posts this week! With a combination of no Internet and going down south for the long weekend, it became very difficult posting. As promised from my weekend away I did do some OOTD for you so I have put together a little style book of my outfits.  If you have seen my last post you will remember two of the items. All info will be listed below.


Top: Target in Khaki
Necklace: Lovisa
Pants: Forever new


Dress: Miss Shop (in previous post)


Top: Jag (On Previous post)
Pants: Leggings from Forever New
Jacket: Finders Keepers- Ginger Owl


Sunglasses: Dotti
Bag: Louis Vuitton Neverfall
Skirt: Kmart
 
 
Thanks Everyone for viewing my blog! It would mean the world if you could subscribe and check out my instagram :)
 
Thank you
 
Much love
 
Suzie
 
xoxox